本文最后更新于:几秒前
【注】 本实验及之后的实验都将从PaddlePaddle和Pytorch两个版本进行,其中paddlepaddle是邱锡鹏老师官方的实验工具,pytorch是我为了能尽快上手而尝试的工具(×)
实验文档的大部分文字都来源于邱锡鹏老师的网课练习notebook中,部分会进行补充或精简
本节实验介绍 本次实验是有关于实验基础知识的讲解,包括张量、算子和数据集等信息
张量 :深度学习中表示和存储数据的主要形式。算子 :构建神经网络模型的基础组件。每个算子有前向和反向计算过程,前向计算对应一个数学函数,而反向计算对应这个数学函数的梯度计算。有了算子,我们就可以很方便地通过算子来搭建复杂的神经网络模型,而不需要手工计算梯度。
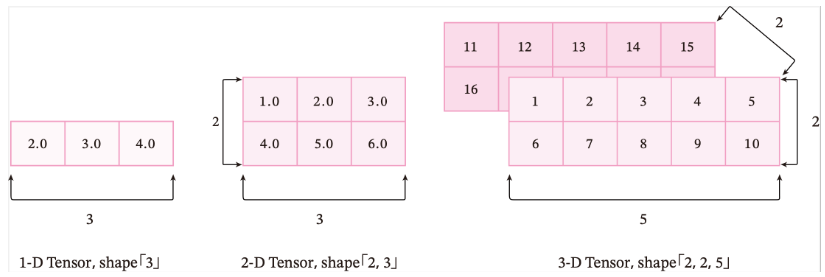
张量 在深度学习的实践中,我们通常使用向量或矩阵运算来提高计算效率。比如$w_1x_1 + w_2 x_2 +\cdots +w_N x_N$的计算可以用$w^\top x$来代替,这样可以充分利用计算机的并行计算能力,特别是利用GPU来实现高效矩阵运算。在深度学习中,以张量来存储与表示数据,张量是矩阵的扩展与延伸,可以认为是高阶的矩阵 。1阶张量为向量,2阶张量为矩阵。如果你对Numpy熟悉,那么张量是类似于Numpy的多维数组(ndarray)的概念,可以具有任意多的维度。
单个张量的数据类型必须是一致的,这个数据类型可以是布尔型、整型、复数等,因此需要给张量定义一个数据类型(dtype) 来表示其数据类型。
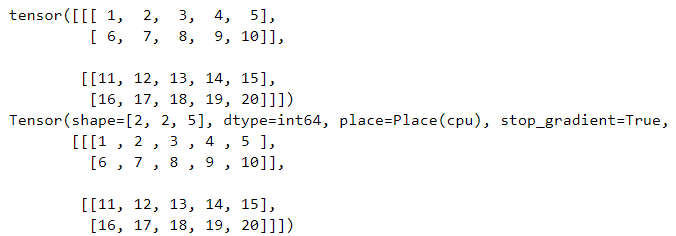
创建张量 1 2 3 4 5 6 7 8 9 10 11 1 , 2 , 3 , 4 , 5 ],6 , 7 , 8 , 9 , 10 ]],11 , 12 , 13 , 14 , 15 ],16 , 17 , 18 , 19 , 20 ]]])1 , 2 , 3 , 4 , 5 ],6 , 7 , 8 , 9 , 10 ]],11 , 12 , 13 , 14 , 15 ],16 , 17 , 18 , 19 , 20 ]]])
需要注意的是,张量在任何一个维度上的元素数量必须相等。
指定形状(torch和paddle的API用法一致) 1 2 3 4 5 6 7 8 9 10 11 12 13 14 15 16 17 m, n = 2 , 3 10 )10 )1 , end=5 , step=1 )0 , end, step=1 )1 , stop=5 , num=5 )0 , end=10 , step=2 )
张量有如下属性:
ndim:张量的维度,例如向量的维度为1,矩阵的维度为2。shape: 张量每个维度上元素的数量。shape[n]:张量第nn维的大小。第nn维也称为轴(axis)。size:张量中全部元素的个数。
以torch的张量属性为例,paddle与torch不同的用法另外标注:
1 2 3 4 5 6 7 8 9 10 ndim_4_Tensor = torch.ones([2 , 3 , 4 , 5 ])2 ,3 ,4 ,5 ])print ("Number of dimensions:" , ndim_4_Tensor.ndim)print ("Shape of Tensor:" , ndim_4_Tensor.shape)print ("Elements number along axis 0 of Tensor:" , ndim_4_Tensor.shape[0 ])print ("Elements number along the last axis of Tensor:" , ndim_4_Tensor.shape[-1 ])print ('Number of elements in Torch tensor: ' , ndim_4_Tensor.numel())print ("Number of elements in Paddle tensor: " , ndim_4_p.size)
张量的形状也可以通过reshape函数来进行变换,变换后数据本身和数据的相对顺序都不会有变化。
1 2 3 4 5 6 7 8 9 1 , 2 , 3 , 4 , 5 ],6 , 7 , 8 , 9 , 10 ]],11 , 12 , 13 , 14 , 15 ],16 , 17 , 18 , 19 , 20 ]],21 , 22 , 23 , 24 , 25 ],26 , 27 , 28 , 29 , 30 ]]])2 , 5 , 3 ])print ("After reshape:" , reshape_Tensor)
注意这里的修改前和修改后的shape_size应该是一样的,否则会报错
使用reshape时有一些简单技巧:
reshape中有且仅有一维可以为-1,表示按照原有size直接补齐
reshape中可以有多维为0,表示继承原有张量在当前维度的元素个数
除了reshape变换外,还可以使用unsqueeze函数在原有张量基础上插入尺寸为1的维度,其中paddlepaddle支持多个维度的插入,而pytorch的dim参数为整型,限制只能有一个维度的插入。
1 2 3 4 5 6 7 8 ones_Torch = torch.ones([5 , 10 ])0 )print ('new Tensor 1 shape: ' , new_Tensor1.shape)2 )print ('new Tensor 2 shape: ' , new_Tensor2.shape)5 ,10 ])1 ,2 ])print ('new Tensor 3 shape: ' ,new_Paddle1.shape)
数据类型 dtype参数用来查看张量的数据类型,支持类型支持bool、float16、float32、float64、uint8、int8、int16、int32、int64和复数类型等数据。其中通过Python元素创建的数据可以使用dtype指定类型 ,默认整型为int64,浮点类型为float32;通过Numpy数组创建的张量,则与其原来的数据类型保持相同 。
paddle的to_tensor函数和torch的as_tensor函数可以实现从其他类型(包括Numpy)到tensor的转换
1 2 3 print ("Tensor dtype from Python integers:" , torch.as_tensor(1 ).dtype)print ("Tensor dtype from Python floating point:" , paddle.to_tensor(1.0 ).dtype)
如果想要修改数据类型,paddle使用cast函数,torch使用to方法可以实现。
1 2 3 4 5 6 7 8 9 10 1.0 )1.0 )'int64' )print ("Tensor after cast to int64:" , int64_Tensor_Paddle.dtype,int64_Tensor_Torch.dtype)
设备转换 在paddle中共有三种可使用的设备类型,使用place参数进行设置
1 2 3 4 5 6 7 8 9 10 1 , place=paddle.CPUPlace())print ('cpu Tensor: ' , cpu_Tensor.place)1 , place=paddle.CUDAPlace(0 ))print ('gpu Tensor: ' , gpu_Tensor.place)1 , place=paddle.CUDAPinnedPlace())print ('pin memory Tensor: ' , pin_memory_Tensor.place)
在torch中需要使用device方法设置具体的设备对象,torch.device() 方法是在torch中使用频率十分高的一种方法。torch.device代表将torch.tensor分配到的设备的对象。torch.device可以采用字符串和编号的参数定义设备
1 2 3 4 5 6 7 8 'cuda:0' )'cpu' )'cuda' ) 'cuda' , 0 )'cpu' , 0 )
访问张量 paddle和torch都支持python和Numpy的索引和切片操作
1 2 3 4 5 6 7 8 9 10 11 12 0 , 1 , 2 , 3 , 4 , 5 , 6 , 7 , 8 ])0 , 1 , 2 , 3 , 4 , 5 , 6 , 7 , 8 ])print ("Origin Tensor:" , ndim_1_Tensor)print ("First element:" , ndim_1_Tensor[0 ])print ("Last element:" , ndim_1_Tensor[-1 ])print ("All element:" , ndim_1_Tensor[:])print ("Before 3:" , ndim_1_Tensor[:3 ])print ("Interval of 3:" , ndim_1_Tensor[::3 ])print ("Reverse:" , ndim_1_Tensor[::-1 ])
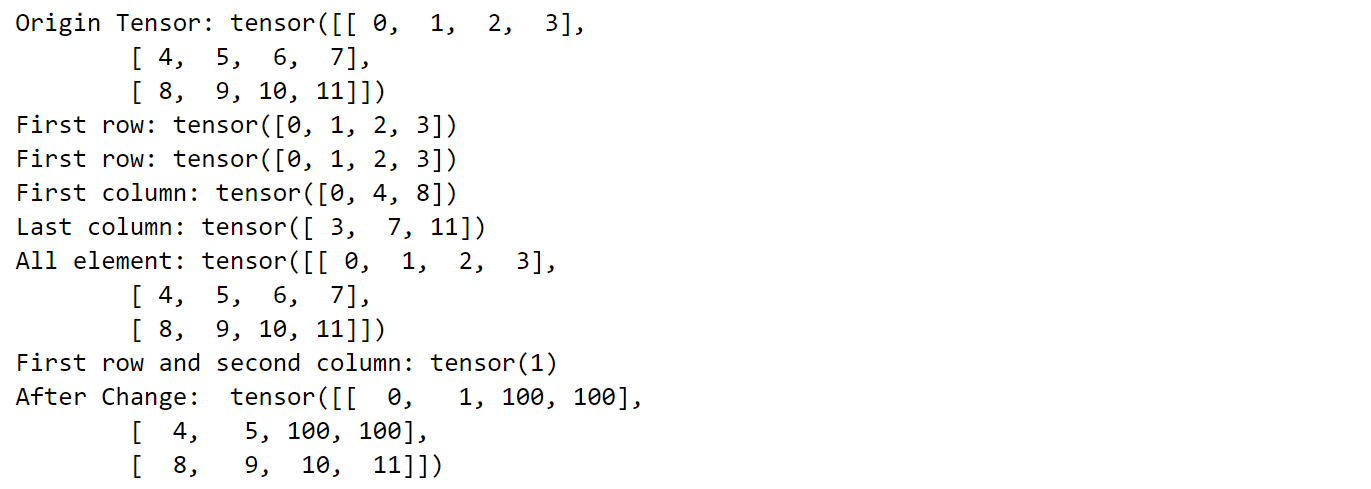
二维的张量同样可以采用索引或切片访问与修改,其中每个参数对应其中的一维。以torch为例
1 2 3 4 5 6 7 8 9 10 11 12 13 14 15 0 , 1 , 2 , 3 ],4 , 5 , 6 , 7 ],8 , 9 , 10 , 11 ]])print ("Origin Tensor:" , ndim_2_Tensor)print ("First row:" , ndim_2_Tensor[0 ])print ("First row:" , ndim_2_Tensor[0 , :])print ("First column:" , ndim_2_Tensor[:, 0 ])print ("Last column:" , ndim_2_Tensor[:, -1 ])print ("All element:" , ndim_2_Tensor[:])print ("First row and second column:" , ndim_2_Tensor[0 , 1 ])0 :2 ,2 :] = 100 print ("After Change: " ,ndim_2_Tensor)
【提醒】慎重 通过索引或切片操作来修改张量,此操作仅会原地修改该张量的数值,且原值不会被保存。 如果被修改的张量参与梯度计算,将仅会使用修改后的数值,这可能会给梯度计算引入风险。
张量运算 在这里我们更加推荐使用数学函数进行计算,这里给出比较常用的运算函数,更多请见pytorch-Tensor操作文档 和Paddle官方文档
数值计算:
1 2 3 4 5 6 7 8 9 10 11 12 13 14 15 16 17 18 19 20 21 22 23 24 25 pow (y) abs () round () max () min () sum ()
逻辑计算
1 2 3 4 5 6 7 8 x.isfinite()
矩阵运算
1 2 3 4 5 x.t() 1 , 0 ) 'fro' ) 2 )
广播 pytorch和paddle中都支持使用广播机制对两个维度不同的矩阵进行计算,属于数组的广播机制。通常来讲,如果有一个形状较小和一个形状较大的张量,会希望多次使用较小的张量来对较大的张量执行某些操作,看起来像是形状较小的张量首先被扩展到和较大的张量形状一致,然后再做运算。
广播的规则:
每个张量至少为一维
从后往前比较张量的形状,当前维度的大小要么相等,要么其中一个等于1,要么其中一个不存在。
广播的计算规则:
如果两个张量shape的长度不一致,那么需要在较小长度的shape前添加1,直到两个张量的形状长度相等
保证两个张量形状相等之后,每个维度上的结果维度就是当前维度上较大的那个。
示例:
1 2 3 4 5 6 7 8 9 10 11 12 13 14 15 16 17 18 19 2 , 3 , 4 ))2 , 3 , 4 ))print ('broadcasting with two same shape tensor: ' , z.shape)2 , 3 , 1 , 5 ))3 , 4 , 1 ))'''首先补足y = shape(1,3,4,1) x = shape(2,3,1,5) 按位进行合并,对应位上或者相等,或者有一位为1可以直接合并 1 cpr 2 --> 2 3 cpr 3 --> 3 4 cpr 1 --> 4 1 cpr 5 --> 5 ''' print ('broadcasting with two different shape tensor:' , z.shape)
矩阵乘法matmul中也用到了广播的机制,其将矩阵看作一个对象单位,和数据广播的数值处在同一等级,然后进行广播计算,具体的
如果两个张量均为一维,则获得点积结果。
如果两个张量都是二维的,则获得矩阵与矩阵的乘积。
如果张量x是一维,y是二维,则将x的shape前面补一维变成[1, D],与y进行矩阵相乘后再删除前置尺寸。
如果张量x是二维,y是一维,则获得矩阵与向量的乘积。
如果两个张量都是N维张量(N > 2),则根据广播规则广播非矩阵维度(除最后两个维度外其余维度)。比如:如果输入x是形状为[j,1,n,m]的张量,另一个y是[k,m,p]的张量,则输出张量的形状为[j,k,n,p]。
原位操作 在torch和paddle中,计算函数的返回结果都是创一个新的张量来存储,而不会形象原有的张量,这种处理方式称为”非原位“,部分函数支持通过在函数后加一个下划线来实现原位操作,如x.add(y) –> x.add_(y)
算子 基于深度学习的前向传播与反向传播两个流程,从$x$到$y$的计算看作一个前向计算过程。前向的传播流程$y=f_L(\cdots f_2(f_1(x)))$,则$f_l(⋅)$称为前向函数;而神经网络的参数学习需要找到函数对所有参数的偏导数。
依据链式法则:$\begin{aligned}\frac{\partial y}{\partial \theta_l} &= {\frac{\partial f_l}{\partial \theta_l}} \frac{\partial y}{\partial f_l} \&= \frac{\partial f_l}{\partial \theta_l} \frac{\partial f_{l+1}}{\partial f_l} \cdots \frac{\partial f_L}{\partial f_{L-1}} .\end{aligned}$,一种比较高效的方法就是递归计算每个偏导,反向计算。令$\delta_l\triangleq \frac{\partial y}{\partial f_l}$,则有$\delta_{l-1} = \frac{\partial f_l}{\partial f_{l-1}} \delta_{l}.$,则从后往前可以计算出所有的偏导。
如果我们实现每个基础函数的前向函数和反向函数,就可以非常方便地通过这些基础函数组合出复杂函数,并通过链式法则反向计算复杂函数的偏导数。 在深度学习框架中,这些基本函数的实现称为算子(Operator,Op)。有了算子,就可以像搭积木一样构建复杂的模型。
算子定义 算子是构建复杂机器学习模型的基础组件,包含一个函数$f(x)$的前向函数和反向函数。为了可以更便捷地进行算子组合,
本书中定义算子Op的接口如下:
1 2 3 4 5 6 7 8 9 10 11 12 13 14 15 16 17 18 19 20 class Op (object ):def __init__ (self ):pass def __call__ (self, inputs ):return self.forward(inputs)def forward (self, inputs ):raise NotImplementedErrordef backward (self, outputs_grads ):raise NotImplementedError
算子应用 以$g = \exp(a \times b+c \times d)$为例,分别实现加法、乘法和指数运算三个算子,通过算子组合计算$y$值。
加法算子
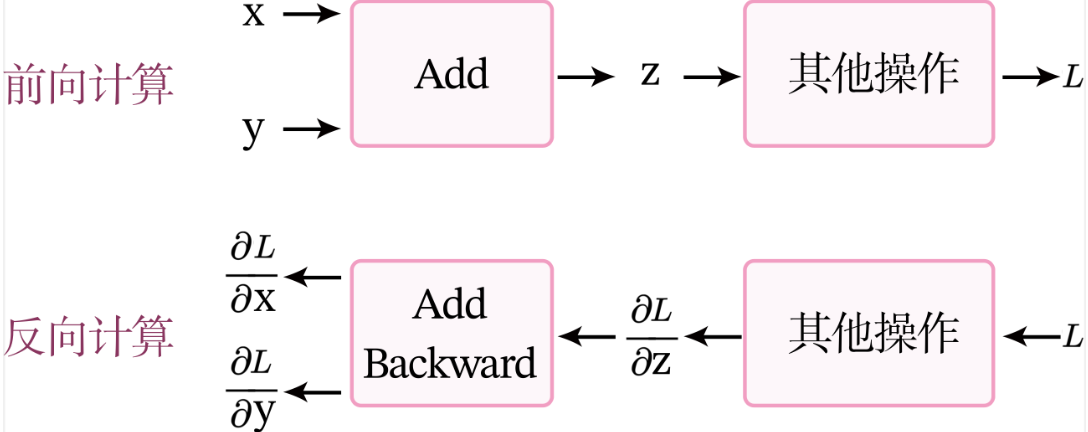
加法算子的计算过程如下:
前向计算的过程输出的是x+y=z,即输出z做结果;反向计算梯度,假设输出的结果为L,最终输出为$L$,令$\delta_z=\frac{\partial L}{\partial z}$,$\delta_x=\frac{\partial L}{\partial x}$,$\delta_y=\frac{\partial L}{\partial y}$。加法算子的反向计算的输入是梯度$\delta_z$,输出是梯度$\delta_x$和$\delta_y$。根据链式法则,$\delta_y=\frac{\partial z}{\partial y}\delta_z$,可以直接根据z = x+y求得$\delta_x = \delta_z \times 1$,$\delta_y = \delta_z \times 1$。
1 2 3 4 5 6 7 8 9 10 11 12 13 14 15 16 17 class add (Op ):def __init__ (self ):super (add, self).__init__()def __call__ (self, x, y ):return self.forward(x, y)def forward (self, x, y ):return outputsdef backward (self, grads ):1 1 return grads_x, grads_y
乘法算子
同加法算子的原理,前向传播计算乘法的结果,反向传播计算梯度,根据z = x*y求得$\delta_x = \delta_z \times y$,$\delta_y = \delta_z \times x$。
1 2 3 4 5 6 7 8 9 10 11 12 13 14 15 16 17 class multiply (Op ):def __init__ (self ):super (multiply, self).__init__()def __call__ (self, x, y ):return self.forward(x, y)def forward (self, x, y ):return outputsdef backward (self, grads ):return grads_x, grads_y
指数算子
输入x,前向传播计算指数函数$z=e^x$,反向传播计算梯度,根据公式可得$\delta_x = \delta_z \times e^x$
1 2 3 4 5 6 7 8 9 10 11 12 13 14 import mathclass exponential (Op ):def __init__ (self ):super (exponential, self).__init__()def forward (self, x ):return outputsdef backward (self, grads ):return grads
对算子进行结合应用
1 2 3 4 5 6 7 8 9 10 11 12 13 a, b, c, d = 2 , 3 , 2 , 2 print ('y: ' , y)print (x1," " ,y1," " ,x2," " ,y2)
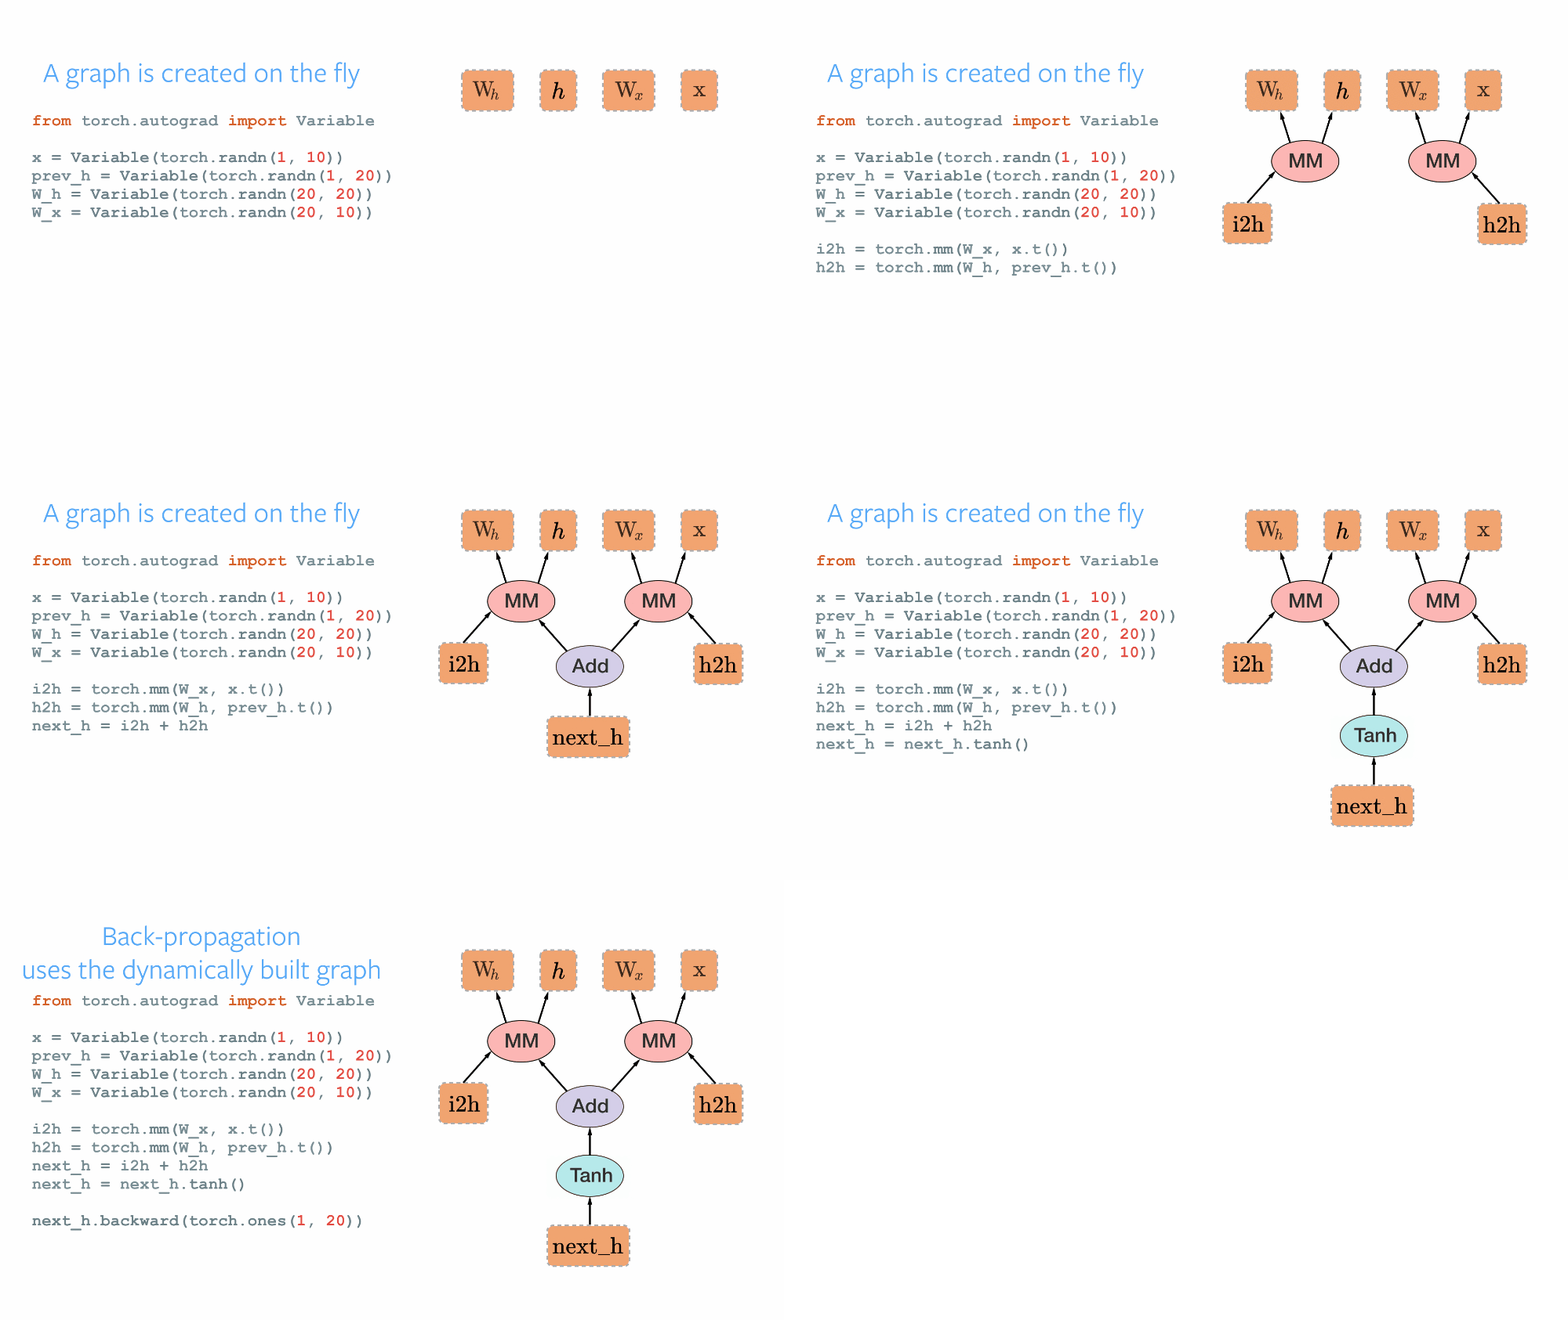
自动微分机制 目前大部分深度学习平台都支持自动微分(Automatic Differentiation),即根据forward()函数来自动构建backward()函数。自动微分的原理是将所有的数值计算都分解为基本的原子操作,并构建计算图DAG(可以理解为有向无环图)。在模型的构建阶段实时生成有关过程的图。
预定义算子 在深度学习中,大多数模型都是以各种神经网络为主,由一系列层(Layer)组成,层是模型的基础逻辑执行单元。如paddle.nn.Layer、torch.nn.Layer类来方便快速地实现自己的层和模型。当我们实现的算子继承Layer类时,就不用再定义backward函数,自动微分机制可以自动完成反向传播过程,让我们只关注模型构建的前向过程,不必再进行烦琐的梯度求导。
完
