本文最后更新于:几秒前
因为个人觉得自己的pytorch水平实在是菜,故想着自己复现一个经典模型,复现过程中提一提自己的代码水平。
本文参考自教程Pytorch Transformers from Scratch (Attention is all you need) - YouTube ,这个教程中详尽介绍了Transformer的实现过程,我跟了一遍之后能够自己再次复现,十分有效。在行文过程中,本文也会就比较陌生的torch函数补充讲解一丢丢。
注意:此教程中未实现论文中所说的一些trick,如sin函数的pos_embedding等,这些会在之后的过程中予以完善。
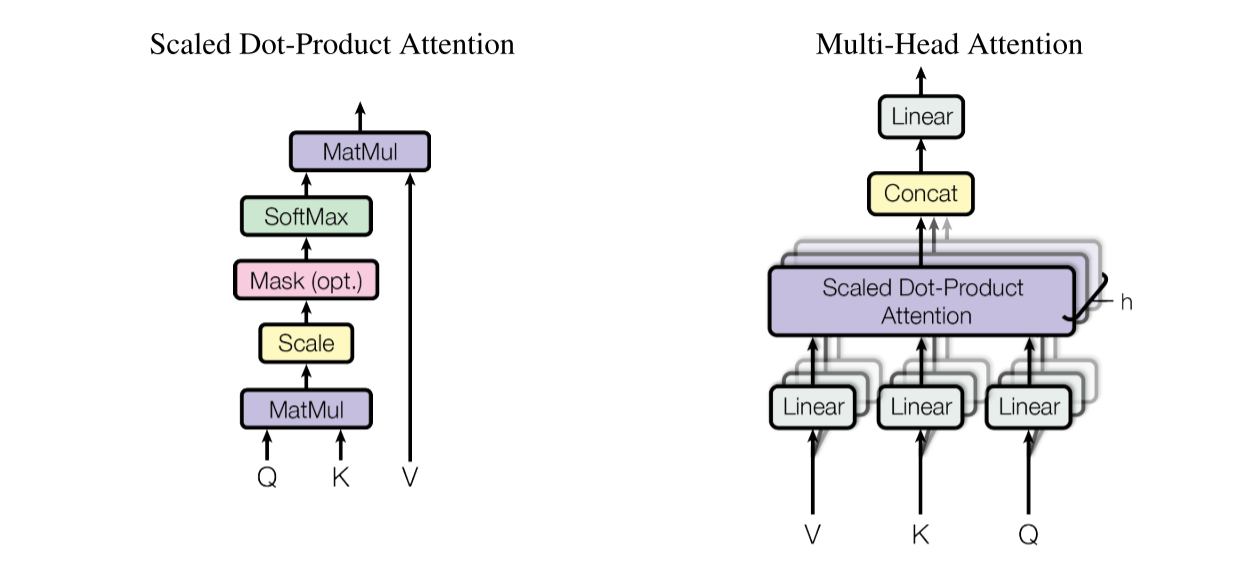
自注意力机制 实现 Transformer中最为核心的部分就是将mask的自注意力机制融入到了框架中,这个部分也是最难实现的部分。点积自注意力机制的框架在论文中如图所示:
其中,注意力部分的公式如下:
首先说明:创建一个block(class),最重要的就是__init__和forward两个部分,其中__init__定义基本参数和需要跟着模型训练的参数;forward函数用于定义基本逻辑。以自注意力模块的部分为例,__init__函数定义模型的embed_size,以及逻辑实现过程中需要的层(nn.XXX)。SelfAttention的代码如下:
1
2
3
4
5
6
7
8
9
10
11
12
13
14
15
16
17
18
19
20
21
22
23
24
25
26
27
28
29
30
31
32
33
34
35
36
37
38
39
40
41
42
43
44
45
46
47
48
49
50
51
52
53
54
class SelfAttention (nn.Module):def __init__ (self,embed_size,heads ):super (SelfAttention,self).__init__()assert (self.heads_dim * heads == embed_size), "Embed size must be divided by num of heads" def forward (self,value,key,query,mask ):0 ]1 ],key.shape[1 ],query.shape[1 ]"nqhd,nkhd->nhqk" ,[query,key])1 /2 )if mask is not None :0 , float ('-1e20' ))1 )'nhqk,nkhd->nqhd' ,[energy,value]).reshape(N,q_len,self.heads*self.heads_dim)return out
从__init__函数中看到,多头自注意力机制的“多头”是在这里进行划分;且为达到Multi-head Attention中对Q、K、V分开操作,以及最后的线性变换,需要设置对应的Linear层。
从__forward函数中看到,这段代码实现了基本的Scale Dot-Prodution Attention,按照
1 Divide into heads -> Linear Func -> Matmul(energy) -> Scale -> Mask(masked_ fill) -> Softmax(at dim -1) -> Matmul
的顺序逐步进行矩阵变换与点乘。
第 20-23 行对应的是Divide into heads步骤。forward接收的Q、K、V参数的shape是N x seq_len x embed_size,其中N表示一个batch里的总数,seq_len代表sequence的长度,embed_size在这里也对应于self.embed_size的参数。为了完成多头注意力机制,对于Q、K、V要做reshape操作,将原shape重构成[N, key_len, heads, heads_dim],其中H代表头的数量(heads),D代表每个头的维度dim,其中和定义的一样,embed_size = heads * heads_dim。
第 25-28 行对应Q、K、V的线性变换操作,不再赘述
第 30-37 行对应第一个Matmul操作和Scale放缩,是对Q和K完成点乘。这里有矩阵shape的变换如注释所示,从两个单独的矩阵变成一个乘积矩阵,实现方法有以下两种:
1 2 3 4 5 6 7 8 9 query = query.permute(0 ,2 ,1 ,3 ) # shape: [N, n_heads, query_len, head_dim] key = key.permute(0 ,2 ,1 ,3 ) # shape: [N, n_heads, key_len, head_dim] energy = (Q @ K.permute(0 ,1 ,3 ,2 )) / self.embed_size ** (1 /2 ) # energy shape: [N, n_heads, query_len, key_len] energy = torch.einsum('nqhl,nkhl->nhqk',[query,key])energy = energy / self.embed_size ** (1 /2 )
其中,第一种方法逐步操作比较好理解,我们的目标shape为[N, n_heads, query_len, key_len],方便之后和V点乘时的操作,需要保留N和heads这两个维度,因此首先对Q和K进行维度操作,这里用到了矩阵维度变换中常用的两种操作(见下注解1),将这两个维度前置。完成reshape操作之后,Q @ K.permute获得了结果为[N, n_heads, query_len, key_len]的乘积。
第二种是一种特化表示法(见下注解2)的使用,逻辑和上面其实大差不差,但是操作上会简化很多。这样基本就实现了Q @ K的维度操作,这里难度比较大。
第 39-41 行实现Mask部分的操作,如果设置了mask,自注意力就将mask填充到注意力的结果中。这里使用到了masked_fill方法。
第 43-44 行完成softmax操作,对最后一维(数值维)进行softmax
第 45-49 行完成第二个Matmul操作,这里的方式和前面讲解的基本一致,需要注意的是我们最后得到结果理论上应该是query的shape,即在注意力计算之后shape不变,因此需要首先reshape成[N, q_len, heads, heads_dim],然后再将最后两维合并成[N, q_len, embed_size]
第 51-52 行完成注意力计算后的线性变换。至此完成点积注意力的实现。
注解
注解1:维度修改(torch.view)和维度转置(torch.permute)
参见pytorch中reshape()、view()、permute()、transpose()总结_景唯acr的博客-CSDN博客
torch.view和torch.reshape 两个方法为维度修改操作,是针对维度进行修改,可以删除或者增加维度,pytorch 中的 torch.reshape() 大致相当于 tensor.contiguous().view()。使用torch.view()时需要保证tensor的连续性contiguous
torch.permute和torch.transpose两个方法为维度转置操作,transpose 只能一次转换两个维度,permute 可以一次转换多个维度。具体来说,permute通过对原shape从左到右标号,然后重新设置先后顺序,来达到多个维度的转置。
注意,permute和transpose都不能实现维度的增加或减少。
注解2:爱因斯坦求和(torch.einsum)
参见:Pytorch中, torch.einsum详解-CSDN博客
爱因斯坦求和是一种对求和公式简洁高效的记法,以一种统一的方式表示各种各样的张量运算(内积、外积、转置、点乘、矩阵的迹、其他自定义运算),简化基本运算的操作。当然这个维度变换需要一定的学习成本。以上面的代码为例
1 2 3 4 'nqhl,nkhl->nhqk' ,[query,key])
注解3:掩码填充(torch.masked_fill)
函数签名:masked_fill_(mask, value)
用value填充tensor中满足mask表达式的部分
1 2 0 , float ('-1e20' ))
实现
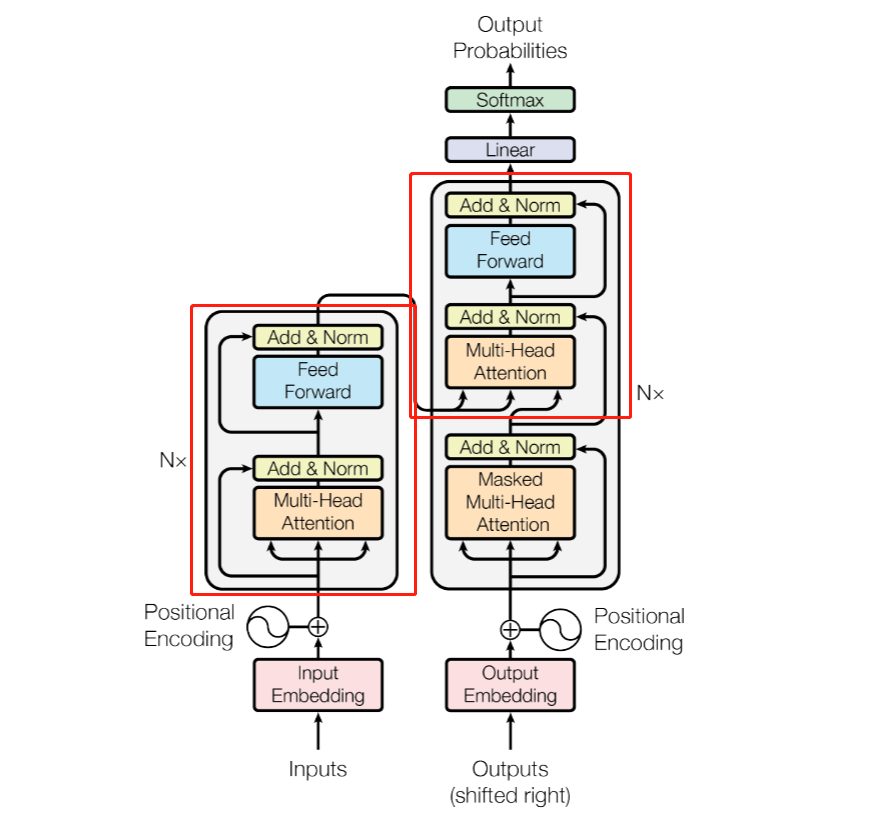
在Transform的Encoder和Decoder中,有一段Block可以复用,如红框所示,这里我们首先实现这个Block。
在图中可以看出,Block按照
1 Multi-head Attention(SelfAttention) -> Add&Norm -> Feed Forward -> Add&Norm
的顺序构筑,更多的,在Add & Norm之后一般需要接上一个Dropout,在ffn层中一般也要接进去Dropout来提高随机性,因此在__init__部分需要率先对这些层完成预定义。
1
2
3
4
5
6
7
8
9
10
11
12
13
14
15
16
17
18
19
20
21
22
class TransformerBlock (nn.Module):def __init__ (self, embed_size, heads, forward_expansion, dropout ):super (TransformerBlock,self).__init__()'hidden_layer' ,nn.Linear(embed_size,forward_expansion*embed_size)),'activation' ,nn.ReLU()),'dropout' ,nn.Dropout(dropout)),'output_layer' ,nn.Linear(forward_expansion*embed_size,embed_size))
前面的基本参数和attention的定义比较简单,两个norm层在Transformer中使用的是LayerNorm(相对于BatchNorm,见讲解);ffn(feed forward)层先将数据映射到高维空间,然后非线性激活并加入dropout,最后还原,这样先高维后低维的操作可以更好的提取抽象特征;最后的dropout就是两部分之间的随机后处理。
在__init__的参数列表中,embed_size和heads是Attention所需参数;forward_expansion用于ffn层的高维映射,从embed_size映射到forward_expansion * embed_size,即成比例扩大;dropout是Dropout层的drop单位比例。
在forward方法中,输入可以看图片中Block的指入的指针,即下面的Q、K、V三个部分,在计算attention时还需加入mask的处理。forward就实现了Block的基本逻辑
1
2
3
4
5
6
7
8
9
10
def forward (self,value,key,query,mask ):return out
首先,调用attention,传入Q、K、V和mask,执行多头注意力操作;后先将attention的值和输入的其中一部分(这里为query,因为Decoder中只有query是从input中输入的)加和做残差,输入到norm1之后执行dropout;后面执行ffn层,并将ffn的输出out和att加和做残差,输入到norm2之后执行dropout。这样就完成了此TransformerBlock的基本逻辑。
注解
注解:LayerNorm和BatchNorm的区别
参见:BatchNorm与LayerNorm的理解 - 知乎 (zhihu.com) ,NLP中 batch normalization与 layer normalization - 知乎 (zhihu.com)
Batch 顾名思义是对一个batch进行操作。假设我们有 10行 3列 的数据,即我们的batchsize = 10,每一行数据有三个特征,假设这三个特征是【身高、体重、年龄】。那么BN是针对每一列(特征)进行缩放,例如算出【身高】的均值与方差,再对身高这一列的10个数据进行缩放。体重和年龄同理。这是一种“列缩放”。
而layer方向相反,它针对的是每一行进行缩放。即只看一笔数据,算出这笔所有特征的均值与方差再缩放。这是一种“行缩放”。
在NLP中,由于BatchNorm操作时是对每句话的第一个词、第二个词、…、第m个词操作,缺乏合理性,而LayerNorm是以每句话为单位操作,因此LayerNorm在NLP中使用的更为广泛。
Encoder
Encoder部分用于对语料的编码,使其能够在提取信息后用于自注意力机制。前文提到的Transformer Block已经实现了Block的构筑,在具体到Encoder部分时我们就只需要完成以下部分:
输入编码:完成Word_Embedding和Position_Embedding
模块堆叠:实现Block x N
1
2
3
4
5
6
7
8
9
10
11
12
13
14
15
16
17
18
19
20
21
22
23
24
25
26
27
28
class Encoder (nn.Module):def __init__ (self, src_vocab_size, embed_size, heads, forward_expansion, dropout, n_layers, max_len, device ):super (Encoder,self).__init__()for _ in range (n_layers)return out
因此,__init__部分就只需完成两个Embedding的定义,多个TransformerBlock的序列定义(nn.ModuleList),还有其中随机Drop用的Dropout层;
1 2 3 4 5 6 7 8 9 10 11 12 for _ in range (n_layers)
forward部分实现基本逻辑,首先定义位置的概念。这里简化位置的定义,直接用0~seq_len-1的位置硬编号来表示word的绝对位置,当然这种基于顺序的位置编码一定是有效的。
对于位置,首先设置一个从0到seq_len-1的(1,seq_len)维tensor,然后使用expand将其扩为(N,seq_len)维(见注解),最后送到device中供运算。
1 position = torch.arange(0 ,seq_len).expand(N,seq_len).to(self.device)
之后,使用定义好的两个embedding模块对原tensor和位置进行编码,相加之后过一个dropout,就实现了对输入的预处理,相加结果存为out,并在下面每次调用一层Transformer Block时作为Q、K、V输入到网络中,获得中间结果并再次存回out供下层输入。在图中我们也可以看到,Encoder的Q、K、V在定义上是一致的,都是输入编码。
注解
注解:tensor扩张(torch.repeat和torch.expand)
参见:「PyTorch」repeat() 和 expand() - 知乎 (zhihu.com)
torch.repeat会复制数据本身,将其从维度上扩展
1
2
3
4
5
x = torch.rand(1 , 3 )>>> x.repeat(3 , 2 )0.7953 , 0.4801 , 0.7178 , 0.7953 , 0.4801 , 0.7178 ],0.7953 , 0.4801 , 0.7178 , 0.7953 , 0.4801 , 0.7178 ],0.7953 , 0.4801 , 0.7178 , 0.7953 , 0.4801 , 0.7178 ]])
上例中,x从第一维(可以理解成行维)扩展三倍(即从一行->三行),从第二维(理解成列维)扩展两倍(即从三列->六列)。
torch.expand在平铺的时候只能扩张大小为 1 的维度,但其不会复制数据,因此效率高于torch.repeat
1
2
3
4
5
6
7
8
9
10
11
12
13
y = torch.rand(3 , 1 , 4 )>>> y.expand(3 , 3 , 4 )0.1799 , 0.5697 , 0.9464 , 0.7371 ],0.1799 , 0.5697 , 0.9464 , 0.7371 ],0.1799 , 0.5697 , 0.9464 , 0.7371 ]],0.6830 , 0.6944 , 0.0609 , 0.6319 ],0.6830 , 0.6944 , 0.0609 , 0.6319 ],0.6830 , 0.6944 , 0.0609 , 0.6319 ]],0.3938 , 0.3009 , 0.9311 , 0.6702 ],0.3938 , 0.3009 , 0.9311 , 0.6702 ],0.3938 , 0.3009 , 0.9311 , 0.6702 ]]])
上例中,y从第二维(单维度)扩展三倍。
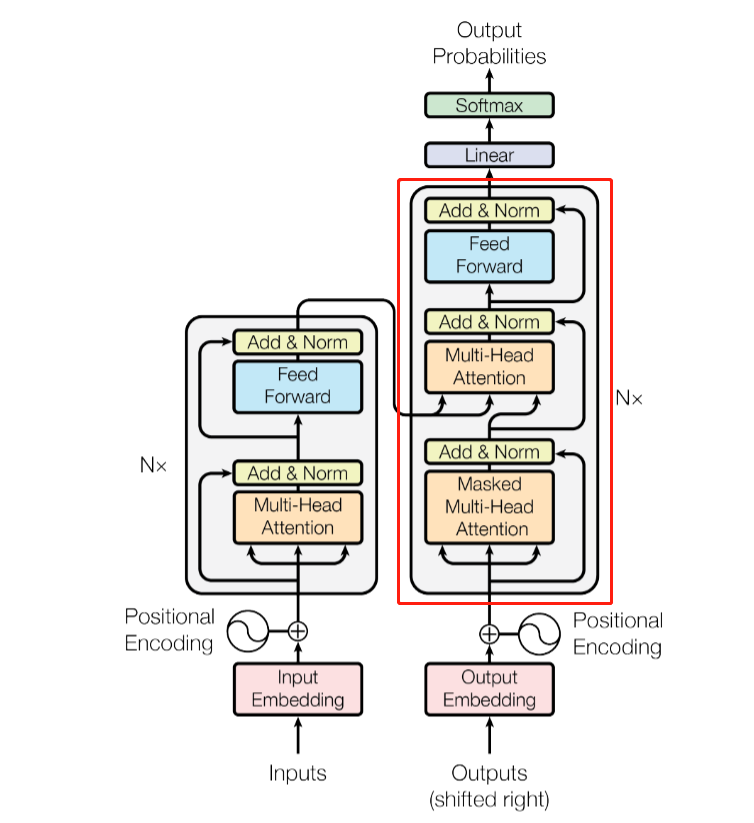
Decoder Block
在实现Transformer Block时我们就提到,Decoder中也有复用的部分,我们完成了复用部分的实现,那其余的部分则需另外实现,这里就是对Decoder部分的另外实现。
在图中可以看出,除了TransformerBlock之外,只有下面的mask-attention模块和携带的add&norm需要实现。
1 2 3 4 5 6 7 8 9 10 11 12 13 14 15 16 17 18 19 20 21 22 23 24 25 class DecoderBlock (nn.Module):def __init__ (self, embed_size, heads, forward_expansion, dropout ):super (DecoderBlock,self).__init__()
和前面实现的部分基本一致,__init__部分实现逻辑需要的模块,这里即为一个Attention、一个LayerNorm,还有一个TransformerBlock;Dropout常规随机处理。
forward的实现也没有什么花样,将其逻辑串起来即可。
1
2
3
4
5
6
7
8
def forward (self,value,key,x,src_mask,trg_mask ):return out
这里我们不区分Decoder的Q、K、V分别是什么,这个区分放到Decoder中来实现。Masked Multi-head Attention的mask使用的是目标语言即trg_mask,而TransformerBlock的部分使用的是从Encoder传过来的语言的src_mask。
Decoder 和Encoder的设置基本一致,Decoder主要将DecoderBlock中未涉及到的输入部分和堆叠部分予以实现,因此__init__部分大部分基本和Encoder一致,不再赘述;除Encoder中涉及到的部分外,Decoder在输出部分会有一个Linear和Softmax,将Decoder的结果映射回到既有维度,Softmax直接使用函数调用,而Linear则需要预定义在__init__中训练。
1
2
3
4
5
6
7
8
9
10
11
12
13
14
15
16
17
18
19
20
21
22
23
24
25
26
27
28
29
class Decoder (nn.Module):def __init__ (self, trg_vocab_size, embed_size, heads, forward_expansion, dropout, n_layers, max_len, device ) :super (Decoder,self).__init__()for _ in range (n_layers)
而forward执行Decoder的步骤,像Encoder一样对输入和位置编码并送到Attention中,执行Add & Norm,后将Decoder的中间结果作为query,Encoder的输出作为key和value输入到TransformerBlock中,以达到用key检索query的能力。最后将Decoder的输出套上线性层和Softmax。
1
2
3
4
5
6
7
8
9
10
11
12
13
14
15
def forward (self,x,enc_out,src_mask,trg_mask ):0 ,seq_len).expand(N,seq_len).to(self.device)for layer in self.layers:return out
将Encoder和Decoder组装起来,即可完成Transformer的搭建,这个模块的功能十分简单,获取Encoder和Decoder的输入,分别送到Encoder和Decoder完成整体训练即可。这里需要注意的是src_mask和trg_mask需要在组装时提前实现。
首先是__init__函数,接收src和trg的vocab_size和pad_idx(一般一致),并将两个部分需要的参数传进来。参数中,大部分是Encoder和Decoder需要的参数(后面八个),前面的四个为source和target序列的基本参数。
1
2
3
4
5
6
7
8
9
10
11
12
13
14
15
16
17
18
19
20
21
22
23
24
25
26
27
28
29
30
31
32
33
34
35
36
37
38
39
40
41
42
class Transformer (nn.Module):def __init__ (self, src_vocab_size, trg_vocab_size, src_pad_idx, trg_pad_idx, embed_size=256 , heads=8 , forward_expansion=4 , dropout=0 , max_len=100 , device="cuda" , n_encoder_layers=6 , n_decoder_layers=6 ):super (Transformer,self).__init__()
然后在Transformer中定义mask的获取方法
对于source部分,实现一个padding mask,我们按照是否为src_pad_idx来判断,如果是则代表token是补足的padding token,没有作用,应该设为无限小的mask。
1
2
3
4
def src_mask (self, src ):1 ).unsqueeze(2 )return src_mask.to(self.device)
对于decoder部分,实现一个sequence mask,旨在mask掉未来的token,使得模型专注于前面的sequence。
1
2
3
4
5
6
7
8
9
def trg_mask (self, trg ):1 ).unsqueeze(2 )bool ().to(self.device) & trg_pad_maskreturn trg_mask.to(self.device)
最后将forward实现即可,forward接收source seq和target seq,生成对应mask,将其先放到Encoder生成encoder_output后,其作为k、v加入到Decoder中。
1
2
3
4
5
6
7
8
9
10
def forward (self,src,trg ):return out
综上便完成了整体Transformer的搭建
Test code 下附一个简单测试代码,没有什么实际含义,主要是用于测试矩阵shape是否对齐。下一篇具体就德语到英语的翻译模型来继续应用咱的Transformer:))))
1
2
3
4
5
6
7
8
9
10
11
12
13
14
15
16
17
18
19
20
21
22
23
24
25
26
27
28
29
30
31
32
33
34
35
36
if __name__ == "__main__" :"cuda" 1 ,5 ,6 ,4 ,3 ,9 ,5 ,2 ,0 ],[1 ,8 ,7 ,3 ,4 ,5 ,6 ,7 ,2 ]]).to(device)1 ,7 ,4 ,3 ,5 ,9 ,2 ,0 ],[1 ,5 ,6 ,2 ,4 ,7 ,6 ,2 ]]).to(device)0 0 10 10 1 ])1 ])1 ]1 , output_dim) 1 :].contiguous().view(-1 ) print (output.shape,trg.shape) print (output)print (trg) 2 )1 ]print ("Predicted Next Token Indices:" )print (predicted_indices)